Saturday, August 30, 2014

Datetime control show Let us know why you need access to this site.

DateTimeControl field uses the iframe calender page to render the actual calender. The location of iframe.aspx is C:\Program Files\Common Files\Microsoft Shared\Web Server Extensions\14\TEMPLATE\LAYOUTS
The problem appeared to be with managed paths in the site collections, the Users with "Contribute access" were accessing the following path:
http://myserver/_layouts/iframe.aspx (Path to Root site collection where user doesn't have access)

The solution:

using  C#:
------------

<SharePoint:DateTimeControl ID="dtcStartDate" runat="server" DateOnly="true"/>

dtcStartDate.DatePickerFrameUrl = SPContext.Current.Web.Url + "/_layouts/iframe.aspx"; 

OR 

<SharePoint:DateTimeControl ID="dtcStartDate" runat="server" DateOnly="true" DatePickerFrameUrl="../../_layouts/iframe.aspx"/>


In sharepoint views:
 --------------------------
<SharePoint:DateTimeControl runat=server  id="dtctrlStartDate" DateOnly="true" DatePickerFrameUrl="../../_layouts/iframe.aspx"/>
 

Remove all html tags in string using jquery


1.Add Jquery Library to your page and write following code in document.ready function.

using bellow code we get pain text from the html :


var myContent = '
Hello world!
';

alert($(myContent).text());

alert message show : Hello word!

Tuesday, August 26, 2014

Attach event receiver to specific list/lists

SharePoint 2010 Event Receiver: -Attach event receiver to specific lists.
............................................................
Creating Event Receiver:
Open visual studio2013 --- > Click on new project ----- >
give name: SampleEvent& Location: C:\solutions\sampleEvent---- >
next Click on Ok button.--- > Click on solution explorer
next give siteurl and select deploy as
a farm solution click on finish. Next right click on solution -- >add --- >
NewItem -- >select SharePoint-- >2010
-- >select event receiver give name:sampleEvent --- >Add
Select event receiver type as List item events from dropdown,
Event source as Customlist from dropdown, check required event
(ex: An Item is being added) next click on finish button. Write required code in Receiver1.cs file
Ex:
namespace EventReciever.EventReceiver11
{
///

/// List Item Events
///
public class EventReceiver11 : SPItemEventReceiver
{
///

/// An item is being added.
///
public override void ItemAdding(SPItemEventProperties properties)
{
base.ItemAdding(properties);
GetValues(properties);
}
void GetValues(SPItemEventProperties properties)
{
try
{
// Get a reference to the current site.
SPWeb currentWeb = properties.OpenWeb();
// Get a reference to the list.
SPList lstAstatus = currentWeb.Lists["AlgorithmStatus"];
SPListItem ListItem = lstAstatus.Items.Add();
ListItem["LoginName"] = currentWeb.CurrentUser.Name;
ListItem["Task"] = "AlgorithmCalculation";
ListItem["Status"] = "C";
this.EventFiringEnabled = false;
ListItem.Update();
this.EventFiringEnabled = true;
}
catch
{
}
}
}
}
- In Solution Explorer open “Elements.xml”
To use an event receiver for one specific list:
- Replace the attribute “ListTemplateId” with “ListUrl” and add your url as value:
------------------------------------------------------------------------------------

<?xml version="1.0" encoding="utf-8"?>
<Elements xmlns="http://schemas.microsoft.com/sharepoint/">
 
 <Receivers  ListTemplateID="100">
      <Receiver>
        <Name>LogHistoryItemDeleting</Name>
        <Type>ItemDeleting</Type>
        <Assembly>$SharePoint.Project.AssemblyFullName$</Assembly>
        <Class>Axalta.Global.DpciformsLogHistory.LogHistory.LogHistory</Class>
        <SequenceNumber>10000</SequenceNumber>
      </Receiver>
  </Receivers>

</Elements>
--------------------------------------------------------------------------------------
-> Replace With:
<?xml version="1.0" encoding="utf-8"?>
<Elements xmlns="http://schemas.microsoft.com/sharepoint/">  
 <Receivers  ListUrl="Lists/NotesCda">
      <Receiver>
        <Name>LogHistoryItemDeleting</Name>
        <Type>ItemDeleting</Type>
        <Assembly>$SharePoint.Project.AssemblyFullName$</Assembly>
        <Class>Axalta.Global.DpciformsLogHistory.LogHistory.LogHistory</Class>
        <SequenceNumber>10000</SequenceNumber>
      </Receiver>
  </Receivers>
</Elements>
… Tip:
To use an event receiver for two or more lists:
You have to add one more “&ltReceivers&gt” node
Sample:
<?xml version="1.0" encoding="utf-8"?>
<Elements xmlns="http://schemas.microsoft.com/sharepoint/">  
 <Receivers  ListUrl="Lists/List1">
      <Receiver>
        <Name>LogHistoryItemDeleting</Name>
        <Type>ItemDeleting</Type>
        <Assembly>$SharePoint.Project.AssemblyFullName$</Assembly>
        <Class>Axalta.Global.DpciformsLogHistory.LogHistory.LogHistory</Class>
        <SequenceNumber>10000</SequenceNumber>
      </Receiver>
  </Receivers>

 <Receivers  ListUrl="Lists/List2">
      <Receiver>
        <Name>LogHistoryItemDeleting</Name>
        <Type>ItemDeleting</Type>
        <Assembly>$SharePoint.Project.AssemblyFullName$</Assembly>
        <Class>Axalta.Global.DpciformsLogHistory.LogHistory.LogHistory</Class>
        <SequenceNumber>10000</SequenceNumber>
      </Receiver>
  </Receivers>
</Elements>

Hide the SharePoint ribbon in a custom list form

Apply following style in forms(new/edit/disp):
it hide the ribbon
<style type="text/css">
#s4-ribbonrow{ display:none; }
</style>

Monday, August 25, 2014

Working with linked Data source


Link data source have two options
I. Merge
II.Join
Merge:  we can merge two or more lists when these lists have same set of fields.
Join: we join lists when two separate lists have one field in common.
Steps to work with linked data source:
I.Merge
Step1: Create two lists employees and customers which is having same columns like Title, First Name, Last Name, Mobile, Country,State  and City and Insert few records into both lists.
Step2: Create Linked data source using above two lists.
i.                    Open SharePoint designer using required site URL(ex: http://localhost:8085/sites/QualitySystems)
ii.                  Click on data sources on the left side pane.
iii.                Next click linked data source   
          Screen:1    

        Screen:2                         
       Screen:3


iv.   Click on general tab and give the data source name as CombineTwoList view


v. Select Source tab and click on Configure linked data source and select customers list 
    click on add button. Similarly add employees list 
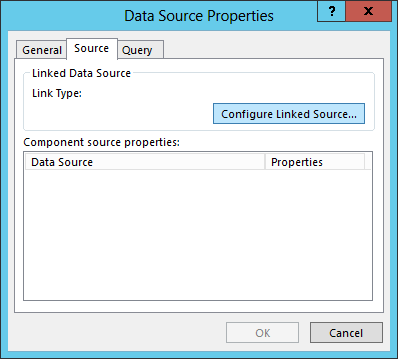


 Click on finish button.   now linked data source is created Successfully.


Step3:  i.Create Document Folder :
             Create one folder for storing  views pages in Site Pages.
             Click site pages next click on the Folder and give name to the folder as         myweparts          
                                   
             ii. Create webpart Page: 
                 Click On Folder i.e.MyWebparts next click webpart page on Top of Ribbon   
                  and Select any one of web part page layout , give names test.aspx 
           
             iii.Right click on test.aspx click on Edit in Advanced mode 


               iv. Select Insert tab next click on data view and select more data sources 


                       v. Select the required data source from linked data sources and click OK.


vi.   In the above page is not displayed required fields so that click on Options
    next click Add/Remove columns and give required display fields and 
    click on OK button.


             vii.Click on Preview button it displays two lists data as follows.
                    
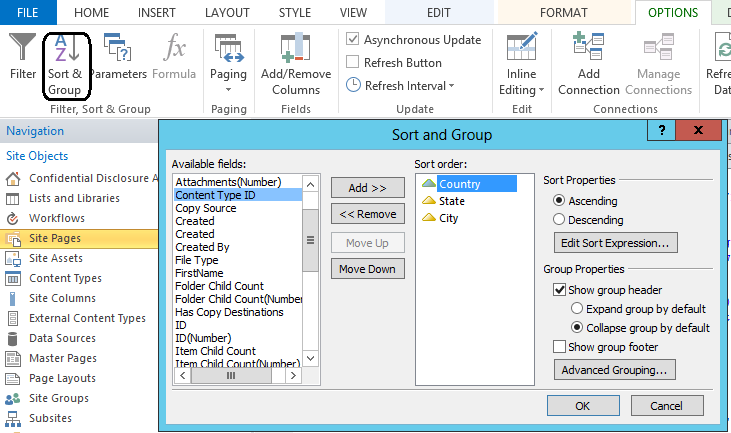
Step4:Applying the grouping 
                        

     Click on OPTIONS on the top of the ribbon next select Sort & Group     
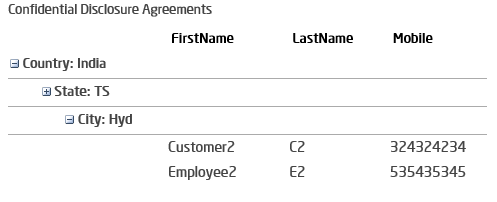
     Select Group field name and show group header  as follows .
       click on Ok button it displays next screen.


           Step5: Paging 
                       Click on paging on the top of the ribbon next click on more paging Options
                     
                            Select the Display items in sets of the size and click on OK button.
                                                       
                          click on preview button.
    
              if page button is not move then deselect asyschronus on the top of the ribbon.

Step:7:Filtering
                          Click filter on the top of the ribbon it displays one popup in the popup
                          select  required  filtered critiria (ex:filter city ='hyd') and click on OK.
                          it displays hyd city records as follows.
                                
  
  Step 8: Sorting 
               Click on Design on the top of the ribbon and check sort & Filter on headers 
              observe field title /display name shoudn't other field
                          Note : for the datetime give isodatetime in the fieldtype and datetime is date only.
                     click on preview.
Development: 

       i. Remove hyper links/look up field hyperlink
         <'xsl:value-of select="substring-before(substring-  after(@country,'>'),'<')" disable-output-escaping="yes" />

      ii.display html to text
         <'xsl:value-of select="@description" disable-output- escaping="yes" />
      iii.display DateTime format (MM/DD/YYYY):
            ddwrt:FormatDate(string(@Created), 1033, 1)
     iv.Two dates Difference:
         <'xsl:value-of select="(number(ddwrt:DateTimeTick(ddwrt:GenDisplayName(string(@Due_x0020_Date)))) - number(ddwrt:DateTimeTick(ddwrt:GenDisplayName(string(ddwrt:TodayIso()))))) div 864000000000" />
    v.if else conditons  
       two fields values are checked using bellow code write this code in to td directly
    vi. navigation link to display form
        <a  href="{@FileDirRef}/{'display.aspx'}?ID={@ID}"
           onclick="GoToLink(this);return  false;" <               
                     <xsl:value-of select="@NotesAuthor" />
                    </a>
   vi.Instead of group empty value give constant Name:( Not Categorized)
                 <xsl:choose>
                                  <xsl:when test="$fieldvalue=''" >
                                 Not Categorized
                                 </xsl:when>
                                 <xsl:otherwise>
                                     <xsl:value-of select="$fieldvalue" disable-output-escaping="yes" />
                                </xsl:otherwise>
                             </xsl:choose>