Friday, October 31, 2014

check edit permission on a specific list/web using ecma script


I.Add Script two files
1.jquery-1.8.2.min.js
2.jquery.SPServices-0.7.2.min.js
in the bellow Content Place Holder
<asp:Content ContentPlaceHolderId="PlaceHolderMain" runat="server">

<script type="text/javascript" src="../../SiteAssets/js/jquery-1.8.2.min.js"></script>
<script type="text/javascript" src="../../SiteAssets/js/jquery.SPServices-0.7.2.min.js"></script>
II. Call function in the document.Ready function
using following code we can check user permission (edit) on a specific list
var _currentUser;
var _theList;
function Editpermissions()
{       
    context = new SP.ClientContext.get_current();
    web = context.get_web();
    this._currentUser = web.get_currentUser();
  // here mention list name ex: employee
    this._theList = web.get_lists().getByTitle('employee');
    context.load(this._currentUser);
    context.load(_theList, 'EffectiveBasePermissions');  
    context.executeQueryAsync(Function.createDelegate(this, Success), Function.createDelegate(this, Failure));
}
function Success()
 {
   if (this._theList.get_effectiveBasePermissions().has(SP.PermissionKind.editListItems))
    {
       alert('User Can Edit the list.');
    }
    else
    {
       alert('User Can NOT Edit the list.');
    }
}
function Failure()
{   
  alert('unable to perform the action');
}
using following code we can check user permission (edit) on a specific web
 function checkpermission()
 { 
      var context;    
      context = new SP.ClientContext.get_current();
      web = context.get_web();
      context.load(web, 'EffectiveBasePermissions');   
      context.executeQueryAsync(onSuccess, onFailure);  
 }
 function onSuccess()
 {
    if (web.get_effectiveBasePermissions().has(SP.PermissionKind.manageWeb))
     { 
     alert('User Can Edit the list.');
    }
}
 function onFailure()
 {
   alert('unable to perform the action');
}

Thursday, October 30, 2014

Retention Policy in SharePoint 2013

Retention:
The Retention policy feature lets you define retention stages, with an action that happens at the end of each stage. For example, you could define a two-stage retention policy on all documents in a specific library that deletes all previous versions of the document one year after the document is created, and declares the document to be a record five years after the document is created.
The actions that can occur at the end of a stage include the following:
àMoving the item to the Recycle Bin
àPermanently deleting the item
àTransferring the item to another location
àStarting a workflow
àSkipping to the next stage
àDeclaring the item to be a record
àDeleting all previous drafts of the item
àDeleting all previous versions of the item
Auditing:
The Auditing policy feature logs events and operations that are performed on documents and list items. You can configure Auditing to log events such as the following:
àEditing a document or item
àViewing a document or item
àChecking a document in or out
àChanging the permissions for a document or item
àDeleting a document or item
· Opening or downloading documents, viewing items in lists, or viewing item properties
· Editing items
· Checking out or checking in items
· Moving or copying items to another location in the site
· Deleting or restoring items
Labeling:
The Labeling policy feature specifies a label to associate with a type of document or list item. Labels are searchable text areas that SharePoint Server 2013 generates based on properties and formatting that you specify. For example, in a law firm, a document related to a legal matter could include a label that contains the clients' names, the case number, and the attorney assigned to the matter. Labels are especially useful in printed versions of documents as a way to display document properties in printed copy. Along with using labels for documents, you can associate a label with a list item and include that label in views of the list.
Note:
The label policy feature has been deprecated and should not be used in SharePoint Server 2013.
Barcode:
The Barcode policy feature enables you to track physical copies of a document by creating a unique identifier value for a document and inserting a bar code image of that value in the document. By default, bar codes are compliant with the common Code 39 standard (ANSI/AIM BC1-1995, Code 39), and you can plug in other bar code providers by using the policies object model.
Example: Move Records to Recycle bin using Working retention policy:
àCreate one List with required columns.
àActive the Site Collection Feature: Library and Folder Based Retention
àActive the Site Feature: Content Organizer
àSet Retention policy to list
àGot List sittings
àNext click on Management Information Policy settings
àNext click on Item content type
àCheck the enable retention
 àNext click on Add retention stage
Event: Select created + 1 Month
Action: Move to recycle Bin
 Click On Ok.
5. Run the timer job Expiration policy from central Administration
Now one Month above Records are deleted.


Note: If you want remove or run the workflow based some column status
So you create one site column and add that column to list
This column now appear in Event: Time Period

Features Related to retention policy are
1. Site Collection Feature: Library and Folder Based Retention
2. Site Feature: Content Organizer
3. Timer jobs :Expiration policy & Information management policy

Wednesday, October 29, 2014

Business Data Connectivity in SharePoint 2013


Business Data Connectivity
Business Connectivity Services is a centralized infrastructure in SharePoint 2013 and Office 2013 that supports integrated data solutions. With Business Connectivity Services, you can use SharePoint 2013 and Office 2013 clients as interfaces into data that doesn’t live in SharePoint 2013 itself. For example, this external data may be in a database and it is accessed by using the out-of-the-box Business Connectivity Services connector for that database. Business Connectivity Services can also connect to data that is available through a web service, or data that is published as an OData source or many other types of external data. Business Connectivity Services does this through out-of-the box or custom connectors. 
External Content Types in BCS
External content types are the core of BCS. They enable you to manage and reuse the metadata and behaviors of a business entity, such as Customer or Order, from a central location. They enable users to interact with that external data and process it in a more meaningful way.
For more information about using external content types in BCS, see External content types in SharePoint 2013. 
How to Connect With SQL External Data Source 
Open the SharePoint Designer 2013 and click on the open site icon:


Input the site URL which we need to open:  


Enter your site credentials here:                                      


 Now we need to create the new external content type and here we have the options for changing the name of the content type and creating the connection for external data source: 


 And click on the hyperlink text “Click here to discover the external data source operations, now this window will open: 


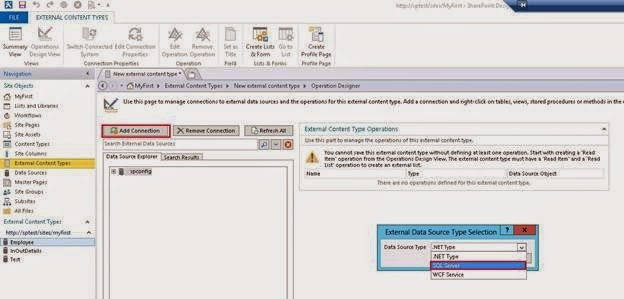
Click on the “Add Connection “button, we can create a new connection. Here we have the different options to select .NET Type, SQL Server, WCF Service.


 Here we selected SQL server, now we need to provide the Server credentials: 


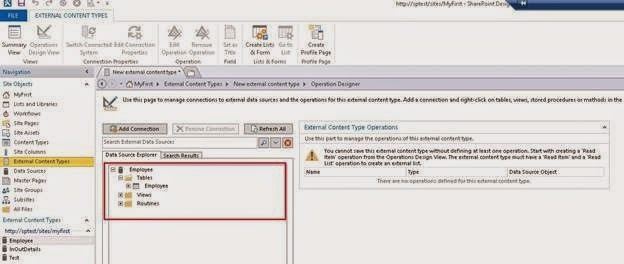
Now, we can see all the tables and views from the database. 


 In this screen, we have the options for creating different types of operations against the database:

 Click on the next button:


Parameters Configurations:
  Options for Filter parameters Configuration:

 
click on finish.

Here we need to add new External List, Click on the “External List”:


 Select the Site here and click ok button: 


 Enter the list name here and click ok button: 


 After that, refresh the SharePoint site, we can see the external list here and click on the list: 


 Here we have the error message “Access denied by Business Connectivity.”


Solution for this Error
SharePoint central admin, click on the Manage service application: 


 Click on the Business Data Connectivity Service: 


 Set the permission for this list: 

Click ok after setting the permissions:

 After that, refresh the site and hope this will work… but again, it has a problem. The error message like Login failed for user “NT AUTHORITY\ANONYMOUS LOGON”.

Solution for this Error
We need to edit the connection properties, the Authentication mode selects the value ‘BDC Identity’. 


After selecting the "BDC Identity" and then click on OK . if it is not saved then use bellow power shell command then update again "BDC Identity" 


Then follow the below mentioned steps. 
Open PowerShell and type the following lines: 

$bcsServiceApp = Get-SPServiceApplication | 
where {$_ -match "Business Data Connectivity Service"} 
$bcsServiceApp.RevertToSelfAllowed = $true; 
$bcsServiceApp.Update();


Now it's working fine.

And there is a chance for one more error like: 
Database Connector has throttled the response.
The response from database contains more than '2000' rows.
The maximum number of rows that can be read through Database Connector is '2000'.
The limit can be changed via the 'Set-SPBusinessDataCatalogThrottleConfig' cmdlet
It's because it depends on the number of recodes that exist in the table.
Solution for this Error
Follow the below steps:
Open PowerShell and type the following lines and execute:
 $bcs = Get-SPServiceApplicationProxy | where{$_.GetType().FullName
-eq (‘Microsoft.SharePoint.BusinessData.SharedService.’ + ‘BdcServiceApplicationProxy’)}
$BCSThrottle = Get-SPBusinessDataCatalogThrottleConfig -Scope database
-ThrottleType items -ServiceApplicationProxy $bcs
Set-SPBusinessDataCatalogThrottleConfig -Identity $BCSThrottle -Maximum 1000000 -Default 20000
Now it will work fine.
Summary
In this article, I tried to explain how implement the Business Data Connectivity in SharePoint 2013.