Wednesday, May 15, 2019

Move/Copy document or item from one site collection to other site collection


Enable workflow elevated permissions

Below are the high-level steps to do enable the workflow:

  1. Allow the workflow to use app permissions in a SharePoint Server 2013/Online site.
  2. Grant full control permission to the workflow.
  3. Wrap the call action inside app step.

  • Go to Site Settings, under Users and Permissions, and click Site app permissions.   
  • Activate the Workflows can use app permissions feature 

Refrence:
https://docs.microsoft.com/en-us/sharepoint/dev/general-development/create-a-workflow-with-elevated-permissions-by-using-the-sharepoint-workflo

Save Pen Input , Images into SharePoint using Power Apps and Flows

Save Pen input or Image into SharePoint using power apps and flows

1. Create flow

New --> Create from template -- > select upload a photos to SharePoint folder

            get  file name and file content from power apps button trigger:

            get and set file Name:

              Add action -- > Data Operation(composed)

              triggerBody()['file']['name']
           
            get and set file content:

            Add action -- > Data Operation(composed)

            base64ToBinary(triggerBody()['file']['contentBytes']) 


          Create file:
                         
            Site address:  siteUrl
            Library:         pictureLibarry
            File:               test.jpg
            ContetBytes:

Save flow

2.power app button trigger switch to flow (pass file from power apps to flow)

open the Url: https://flowstudio.app/

open the above link and right click on file display of the flow and change the JSON definition of the trigger.manual.kind from "Button" to "PowerApp".

3.create a power app screen which contains text input, pen input and button controls

add below code button onSelect

Patch(PowerAppsImages, Defaults(PowerAppsImages), {Title: txtTitle.Text, MyImageData: PenSignature.Image });

PowerAppsFlowUploadImage.Run({file:{name:"Test.jpg",contentBytes:PenSignature.Image}});

Patch command save metadata into sharepoint list (PowerAppsImages) and file pass to flow
flow read the file and save into library and metadata into list.

Below link for reference:
http://johnliu.net/blog/2018/7/the-simplest-no-code-solution-to-save-pictures-files-from-powerapps-to-flow

Friday, January 5, 2018

Tuesday, October 17, 2017

Array values are changes in Angular JS

Array values are changes when we are assigning the scope array values.
Solution : angular.Copy

EX:

for (var i = 0; i < $scope.teamMembers.length; i++) {
   var newTeamMember = angular.copy($scope.teamMember[i]);
  
    $scope.team.teamMembers.push(newTeamMember);
}


Monday, September 25, 2017

Queue in Angular JS


var apiList = ["venkat", "vashith", "nagesh", "utejj"];
var requestUrl = "users/add" + window.location.search;
function AddUsers() {
    return $q.all(apiList.map(function (item) {
        return $http({
            method: 'POST',
            url: requestUrl / item
            //,data: item     //we have internal collection use data
        });
    }))
    .then(function (results) {
        var resultObj = {};
        results.forEach(function (val, i) {
            resultObj[apiList[i]] = val.data;
        });
        return resultObj;
    });
}

Sunday, February 5, 2017

Based on the culture name load the resource files


Add file to project with name : App_GlobalResources
Create resource files in above folder like as following :
enUS.resx
esEs.resx
--
--ect
write the below code in test.aspx.cs:
-----------------------------------------
  protected void Page_PreInit(object sender, EventArgs e)
        {          
            try
            {
                string SPLanguage = Request.QueryString["SPLanguage"];
                string[] arrSPLanguageSplit = SPLanguage.Split('-');
                if (arrSPLanguageSplit.Length > 0)
                {
                    string languageNameAfterSplit = arrSPLanguageSplit[0] + arrSPLanguageSplit[1];
                    if (File.Exists(MapPath(@"~\App_GlobalResources\" + languageNameAfterSplit + ".resx")) == true)
                    {
                        HttpContext.Current.Session["resourceFileName"] = languageNameAfterSplit;
                    }
                    else {
                        HttpContext.Current.Session["resourceFileName"] = "enUS";                  
                    }                
                }
                else {
                    HttpContext.Current.Session["resourceFileName"] = "enUS";              
                }
            }
            catch (Exception ex)
            {  
   HttpContext.Current.Session["resourceFileName"] = "enUS";
                EventLog.WriteEntry("Page_PreInit:resourceFileName", ex.Message, EventLogEntryType.Information);
                     
            }
         }

write the below code in test.aspx:
--------------------------------------
<script language="javascript" type="text/javascript">
 $(document).ready(function ()
{
  var TargetSite = '<%= HttpContext.GetGlobalResourceObject(HttpContext.Current.Session["resourceFileName"].ToString(), "TargetSite") %>';
  var TargetLibrary = '<%= HttpContext.GetGlobalResourceObject(HttpContext.Current.Session["resourceFileName"].ToString(), "TargetLibrary") %>';  
         
            $('#lblTargetSite').text(TargetSite);
            $('#lblTargetLibrary').text(TargetLibrary);
});
</script>

UI:
----
    <div>
         <label id="lblTargetSite" runat="server"></label>        
        </div>
        <br />
        <div >
           <label id="lblTargetLibrary" runat="server"></label>    
        </div>

Thursday, December 8, 2016

Provider Hosted Apps in SharePoint 2013


Create Certificate (Cer):
Go to IIS
Click on server certificates
Next click on the right pane select the self-signed certificate and give the name: TrustedCertificate then
Click on OK
Export Certificate (pfx):
In IIS Click on the certificate next click on the export then select location and give password
Copy Certificate (Cer):
In IIS double click the certificate next select details tab click on CopytoFile
Next click on next button select the No do not export the private key
Next click on next button select the DER encoded binary
Next click on next button choose the file where you want save
Next click on finish button
Run the below PowerShell command:
$cert=Get-PfxCertificate -FilePath "C:\Certs\TrustedCertificate.cer"
 $issuerid=[System.Guid]::NewGuid().ToString() // 35f57afc-2895-4825-9c60-bc37a91e2a51
 $realmid=Get-SPAuthenticationRealm -ServiceContext "http://SPSite:41127/sites/DeveloperSite/"
 //7d99f2ba-4f1e-4962-8a71-174f8df35404
$registeredName=$issuerid + "@" + $realmid
New-SPTrustedSecurityTokenIssuer -Name "DevelopmentApp" -RegisteredIssuerName $registeredName -IsTrustBroker -Certificate $cert
Note:
$issuerId will give the Issuer id
$realmid will give the real Id
$registeredName will give the registered name.
Go to Visual studio:
Select the App for SharePoint the app name: PagesCreationUsingPageViewerWebpart click on OK.
Next give developer site URL and select provider hosted
Click on next select the ASP.NET web forms Application
Click on next select use certificate and give the below details: pfx certificate location, password and realmid
Check in Web.config is done properly or not.
Step 9:Run the project in visual studio and check whether client Id is generated or not in web.config.
Step 10:Change the Permission in AppManifest.xml
Step 12:Run the below script  for generating APP ID
$clientid = " bded8c2e-da2d-4c2a-a8c3-0dbcf3e42f8e"
 $appId = $clientid + "@" + $realmid
 Register-SPAppPrincipal -Site "http://SPSite:41127/sites/DeveloperSite/"  -NameIdentifier $appId
 
Step 13:Run the below script
$config = (Get-SPSecurityTokenServiceConfig)
$config.AllowOAuthOverHttp = $true
$config.Update()
 
Step 14 : Deploy it finally.

Monday, July 18, 2016

Read Excel particular column values and ensure the user in SharePoint site using powershell

Declare Parameters:

Param(
  [string]$filePath,
  [string]$sheetName,
  [string]$siteUrl,
  [string]$authFormat,
  [string]$authProviderName
)

#$filePath = "C:\venkat\MDM.xlsx"
#$sheetName = "Sheet1"

$objExcel = New-Object -ComObject Excel.Application
$workbook = $objExcel.Workbooks.Open($filePath)
$sheet = $workbook.Worksheets.Item($sheetName)
$objExcel.Visible=$false

$rowMax = ($sheet.UsedRange.Rows).count

Write-Host ("last row is: "+$lastRow)
# mention column name to read from the Excel (here 2nd column is read)
$rowUserID,$colUserID = 1,2

for ($i=1; $i -le $rowMax-1; $i++)
{
  $UserID = $sheet.Cells.Item($rowUserID+$i,$colUserID).text
  if ($UserID)
   {    
     $loginName="";  
     #$authProviderName ="";
     #$authFormat = "i:0#.w";
   
     if(!$authProviderName)
      {
         # authProviderName is empty value
         $loginName =   $authFormat+"|"+$UserID;        
       }
     else
     {
       $loginName =   $authFormat+"|"+$authProviderName+"|"+$UserID;
     }

     Write-Host ("UserID is: "+$loginName)

     $spsite = new-object Microsoft.SharePoint.SPSite($siteUrl);

     $web = $spsite.openweb()    

     $claim = New-SPClaimsPrincipal -Identity $UserID -IdentityType WindowsSamAccountName

     $user=$web.EnsureUser($claim.ToEncodedString());
   
     #$user=$web.EnsureUser($UserID);

     Write-Host ("valid user is: "+$user)  
   }
}

$objExcel.quit()

Monday, June 27, 2016

content type hub in share point 2013

Procedure to work with content type hub:

1.      Create a web application

2.       Create root site collection for the new web application, I choose developer template but it work for any template.

3.       Create consumer site collection for checking the content type is received or not.

4.       Activate the “Content type syndication Hub” of the site collection. Go to site settings -> Site Collection Administrator-> site collection features

5.       Create Managed Meta data service (MMS).
a.       Go to Central Administration, click the Application Management, under Service Applications, and click the Manage Service Applications and click on new and select Managed metadata service and enter required fields and give subscriber site collection url.
b.       Click on the Managed Metadata service. Make sure there is not error and Verify the properties of the Managed metadata service are entered properly especially Content Type Hub URL.

6.       Now, go to our content type hub site [which created in first step],
a.       Go to Site Actions and then Site Settings. Under Galleries click on Site Content Types, you will find default Content Type Available.
b.       Create a new content type and add few columns and click on manage content type publishing and Check the Publish Radio button and say OK.

7.       Now go to consumer site collection for checking the content type is received or not.
a.       Go to Site Actions and then Site Settings. Under Galleries click on Site Content Types
Here you can observe the recently created content type, if content type is not there run the timer services from the central admin i.e. Content Type Hub and Content Type Subscriber.


8.       Add one new column to content type in subscriber site and republish the content type, if you are not able to see the new column in consumer site collection content type then run the two services: Go to central admin ->monitoring -> timer jobs ->Review job definitions, run the two services  Content Type Hub   and  Content Type Subscriber 

Friday, June 24, 2016

A network-related or instance-specific error occurred while establishing a connection to SQL Server.

Issue:
A network-related or instance-specific error occurred while establishing a connection to SQL Server. The server was not found or was not accessible. Verify that the instance name is correct and that SQL Server is configured to allow remote connections. (provider: TCP Provider, error: 0 - No connection could be made because the target machine actively refused it.)

Solution: Start --> SQL Service as follows


Tuesday, May 24, 2016

Get Sharepoint List Items using SP Service


Below code copy and past into script Editor webpart and check

<script type="text/javascript" src="../SiteAssets/jquery-1.8.2.min.js"></script>
<script type="text/javascript" src="../SiteAssets/jquery.SPServices-0.7.2.min.js"></scrip>

<script type="text/javascript">
//this is where the script starts after the page is loaded
$(document).ready(function() {

    GetSpeakers();

});

function GetSpeakers()
{
    //The Web Service method we are calling, to read list items we use 'GetListItems'
    var method = "GetListItems";
       
    //The display name of the list we are reading data from
    var list = "Employee";

    //We need to identify the fields we want to return. In this instance, we want the Name (Title),
    //Blog, and Picture fields from the Speakers list. You can see here that we are using the internal field names.
    //The display name field for the Speaker's name is "Name" and the internal name is "Title". You can see it can
    //quickly become confusing if your Display Names are completely differnt from your internal names.
    //For whatever list you want to read from, be sure to specify the fields you want returned.
    var fieldsToRead =     "<ViewFields>" +
                            "<FieldRef Name='Title' />" +
                            "<FieldRef Name='Name' />" +
                            "<FieldRef Name='Description' />" +
                            "<FieldRef Name='DOB' />" +
                            "<FieldRef Name='isActive' />" +
                        "</ViewFields>";
                           
    //this is that wonderful CAML query I was talking about earlier. This simple query returns
    //ALL rows by saying "give me all the rows where the ID field is not equal to 0". I then
    //tell the query to sort the rows by the Title field. FYI: a blank query ALSO returns
    //all rows, but I like to use the below query because it helps me know that I MEANT to
    //return all the rows and didn't just forget to write a query :)
    var query = "<Query>" +
                    "<Where>" +
                        "<Neq>" +
                            "<FieldRef Name='ID'/><Value Type='Number'>0</Value>" +
                        "</Neq>" +
                    "</Where>" +
                    "<OrderBy>" +
                        "<FieldRef Name='Title'/>" +
                    "</OrderBy>" +
                "</Query>";

    //Here is our SPServices Call where we pass in the variables that we set above
    $().SPServices({
        operation: method,
        async: false,  //if you set this to true, you may get faster performance, but your order may not be accurate.
        listName: list,
        CAMLViewFields: fieldsToRead,
        CAMLQuery: query,
        //this basically means "do the following code when the call is complete"
        completefunc: function (xData, Status) {
            //this code iterates through every row of data returned from the web service call
            $(xData.responseXML).SPFilterNode("z:row").each(function() {
                //here is where we are reading the field values and putting them in JavaScript variables
                //notice that when we read a field value there is an "ows_" in front of the internal field name.
                //this is a SharePoint Web Service quirk that you need to keep in mind.
                //so to read a field it is ALWAYS $(this).attr("ows_");
                           
                //get the title field (Speaker's Name)
                var Title = ($(this).attr("ows_Title"));
                           
                //get the blog url, SharePoint stores a url in the form of
                //We only want the . To accomplish this we use the javascript "split" function
                //which will turn into an array where the first element [0]
                //is the url.   Catch all that? if you didn't this is another reason you should be
                //a developer if you are writing JavaScript and jQuery :)
                var Name = ($(this).attr("ows_Name"));
                           
                //same thing as the blog, a picture is stored as
                var Description = ($(this).attr("ows_Description"));

                var DOB = ($(this).attr("ows_DOB"));

                var isActive = ($(this).attr("ows_isActive"));
                if(isActive)
                    isActive="Yes";
                else
                    isActive="No";
                
               // alert("Title: "+Title+"Name: "+Name+"Description:"+Description+"DOB:"+DOB+"is Active"+isActive);
                //call a function to add the data from the row to a table on the screen
                var liHtml = "
  • Name: " + Name +"
    Description: " + Description+"
    DOB: "+DOB+"
    Is active: "+isActive+"
  • "; 
                    $("#ulTasks").append(liHtml);
                               
                });               
            }
        });

    }

    // very simple function that adds a row to a table with the id of "speakerTable"
    // for every row of data returned from our SPServices call.
    // Each row of the table will display the picture of the speaker and
    // below the speaker's picture will be their name that is a hyperlink
    // to the speaker's blog.


    &lt/script>


    <ul id="ulTasks"/&gt


    Get SP List items using javascript object model

    Now we will go through how to get the List Items from SharePoint List using JavaScript Client Object model.


    One restriction in the JavaScript Client Object model is we can’t access the data from different site collections and it can run only in SharePoint environment.
    JavaScript Client Object model gives better performance to the Users since it makes only asynchronous calls to the Server side and retrieves data. It also loads only the requested data and not more that (ie. It retrieves only the Requested content from the server and it doesn’t load all the properties of the object)
    Below code snippet defines the retrieval of list items from SharePoint List using JavaScript model. (Check the inner comments for more details) 
    Below code past into Script Editor webpart and check 
    <script type="text/javascript"/>

    /*Below line will make sure your JavaScript method will be called only after the SP.js file loaded at the client side*/
    ExecuteOrDelayUntilScriptLoaded(QueryFollowUrl, "sp.js");

    function QueryFollowUrl()
    {
        //Gets the Client context of the Web
        var context = new SP.ClientContext.get_current();
        /*if your list exists in the subsite uncomment the below line and remove the above declaration*/
        //var context = new SP.ClientContext(‘/siteurl’);
        var web = context.get_web();

        //Change the List Name with yours
        this.list = web.get_lists().getByTitle('Employee');
           
        var query = SP.CamlQuery.createAllItemsQuery();
          
        listItems = this.list.getItems(query);

        context.load(list); 

        /*Now mention all the required filed internal name, since data from these fields only will be retrieved*/
        context.load(listItems, 'Include(Title,Name,Description,DOB,isActive)');
        //Makes asynchronous call to the Server, which will return the JSON objects
        context.executeQueryAsync(Function.createDelegate(this, this.successFollow), Function.createDelegate(this, this.failedFollow));
        return false;
    }

    //you can get the Error details if your Execution fails using get_message() method
    function failedFollow(sender, args)
    {
        var errorMsg = args.get_message();
    }
    /*Upon successful execution, Success delegate method will be called and all the requested objects will the loaded with contents*/
    function successFollow(sender, args)
    {
        var ListEnumerator = this.listItems.getEnumerator();

        while (ListEnumerator.moveNext())
        {
            var collection = ListEnumerator.get_current();

            /*Using get_item method you can pass the Field Internal name mentioned earlier and get the data in that respective column, if you try to use any other column other than we mentioned earlier, it will throw you error.*/

            var Title = collection.get_item('Title');
            var Name = collection.get_item('Name');
            var Description = collection.get_item('Description');
            var DOB = collection.get_item('DOB');
            var isActive = collection.get_item('isActive');
            //your code here
            var liHtml = "
  • Name: " + Name +"
    Description: " + Description+"
    DOB: "+DOB+"
    Is active: "+isActive+"
  • "; 
            $("#ulTasks").append(liHtml);

        }
    }

    </script&gt

    <!-- table where our speaker rows will go --&gt

    Friday, May 20, 2016

    Recursively walking through a directory tree and listing file names


    public partial class MainWindow : Window
    {
        private void Button_Click_1(object sender, RoutedEventArgs e)
        {
            string sourcePath = @"C:\MasterPageArtifacts\";            
    
            static void DirSearch(string sourcePath)
            {
                try
                {
                    foreach (string d in Directory.GetDirectories(sourcePath))
                    {
                        foreach (string f in Directory.GetFiles(d))
                        {
                            listBox1.Items.Add(f);
                        }
                        DirSearch(d);
                    }
                }                      
                catch (Exception ex)
                {
                    listBox1.Items.Add(ex.Message);
                }
            }
        }
    }

    Wednesday, April 20, 2016

    Read xml fille using LINQ Query

    Xml file: DomainList.xml

    <?xml version="1.0" encoding="utf-8"?>
    <DomainList>
      <DomainName name="https://google.com"/>
      <DomainName name="https://gmail.com"/>
      <DomainName name="fonts.googleapis.com"/>
      <DomainName name="fonts.gstatic.com"/>
    </DomainList>

    C# Code: below code check redirecting url contains in the xml file or Not

       Uri sReturnUrl = new Uri(ReturnUrl);
                XElement main = XElement.Load(HttpContext.Current.Server.MapPath("~/ExcelTemplates/DomainList.xml"));

                var query = (from param in main.Descendants("DomainName")
                             where ((string)param.Attribute("name")).Contains(sReturnUrl.Host)
                             select new
                             {
                                 code = (string)param.Attribute("name")
                             }).FirstOrDefault();

    Validate XSS reflection attacking page URL

    Url:
    https://test.com/Support/Employee/AllItems.aspx/?--%3E%3C/script%3E%3Cscript%3Ealert(235213)%3C/script%3E

    In the above url it shows alert bydefault
    Solution for this:
    <script type="text/javascript">
           var pageUrl = window.location.href;
           var htmlTags = ["script", "style", "img", "font"];
           for (i = 0; i < htmlTags.length; i++) {
               var tagName = htmlTags[i].toString();
               if (pageUrl.indexOf(tagName) > -1) {
                   window.location.href = pageUrl.split("?")[0];            
               }
           }
     </script>

    the above code remove alert.

    Wednesday, November 4, 2015

    Manage content and structure shows internal server error

    Issue: 
    when the site owner click on manage content and structure it shows internal server error
    Solution: go to the site actions --> click on the view all site content
    here click on each list and find out any of the list  shows internal server error, delete that corrupted list using SharePoint designer.
    now manage content and structure is working fine


    Thursday, February 19, 2015

    SharePoint Interview Quetions

    Company 1
    ---------------------------------------------------------------------------------------------
    1.what are the new features in 2013.
    2.without developing the timer can we run the job.
    3.why we are used Oweb.allowunsafeupdates=true;
    4.do you know about apps
    5.the user does not have permission in the site but he can add the record.how it possible through code?
    6. what are different joblocktype types in the timer job
    7.what are the implementation steps to implements the FBA in 2010 or 2013(membership provider and role provider)
    8.write a program for adding attachment in sharepoint.
    9.what is the difference b/w List and Document liabrary.
    10.How to attach lotus note DB to SP
    11.What is Reindexing in sharepoint.
    12.How publish infopath forms
    13.Are you working powershell commands
    14.how we can get objects using powershell
    15.what is a content type
    16.Can we implement a content type in all site collection level
    17.what is content type hub
    18.how we can attach event receiver for specific list
    19.how we can attach event receiver for two lists
    20.are you involved in DB maintenance
    21.what is a Resource throttling
    22.what is the difference b/w SRS reports and Crystal Reports
    23.what is a before and after event receivers
    24.what is the difference between allow unsafeupdats and RunwithElevatedprivilenges
    25.How implement Properties in sharepoint

    Company 2
    ------------------------------------------------------------------------------------------------
    1.How to set custom application page as welcome or Home page.
    2.I want to show one master page for some users and other master page others how you can do this.
    3.Can we call asynchronous call in synchronous call.
    4.How to debug JQury file & Css file.
    5.How to get text box value using JQuery
    6.How you deploy master page using VS.
    7.Element.xml file what contains.
    8.Directly modified changes are reflected in timer jobs.

    Company 3
    ----------------------------------------------------------------------------------------------
    1.What are new feature in SP2013.
    2.what are new features you are implemented in SP2013.
    3.What are the different types of constructors in timerJobs.
    4.What are the enumarators in JobLockTypes in SP Timer Job tell about that.
    5.what is the difference b/w Crawling service and Indexing.
    6.How we can get values from one user control to another user control that are present in same Webpart.
    7.we have 100 users that members have read permission per one list ad remaining people have edit permission
      for the same list how you give this permission using out of box
    8.what is marks percentage from 10th to Mca
    9.How you are implemented client object model in SP2013.
    10.Can we call load method more than once.
    11. Camal query is available in Client object model.
    12.what are new feature you are implemented in workflows.
    13.are you worked with info path forms.
    14.How we can take Content DB back up from 2010 to 2014.
    15.do you have knowledge on SQL & .Net.
    16.How much length of procedure you written in SQL.
    17.How much time you take for design & coding for wsp in VS.
    18.what is a FBA & Windows authentication SP.
    19.I want send mails for 5 days before user How you can send mails to users
    20.timer call in two ways retention policy and timer job using VS.
    21.are you worked with powershell commands.
    22.are you worked with apps.
    23.what are different types delegate controls in SP

    Company 4
    ----------------------------------------------------------------------------
    1st Round:
    1.what is the difference b/w powell shell and stsadm tool
    2.How integrate .net application to sharepoint
    3.Code standards in SP
    2 round:
    ----------------
    1.what is difference b/w Configuration database and content database
    2.what is the difference b/w visual studio wf and designer workflows
    3.what is managed meta data term
    4.how you get the information from client
    5.how to migrate the data from LN to SP
    3.round
    --------------
    joining & ending times in the worked companies
    2.are you involved with client requirements.

    Blog:
    http://sharepointquester.com/2012/03/06/activate-and-configure-in-place-records-management-in-sharepoint-2010/


    Monday, December 22, 2014

    Linked Data Source Joining


    To work with inked data source join,
    there must be one common column relationship between two lists.
    Otherwise it is not works.
    do following Steps:
    Step: 1
    Create two Lists with Names as Indent Request and Indent Response
    and its common column name is     MOC ID NO
    Step: 2
    Create linked data source(JoiningLists) using these two lists with join selection.
    Step: 3
    Create web part page
    Step: 4
    Create Data View web part

    Step: 3
    Open SharePoint designer with respective site url
    On the left pan click on site Pages
    Click on Web part page
    Give name: JoiningLists
    Click on between the web part zone
    <WebPartPages:WebPartZone runat="server" Title="loc:FullPage" ID="FullPage" FrameType="TitleBarOnly">
    <ZoneTemplate>
    On the Top of ribbon select Data view
    Next click on More Data Sources
    Select Linked data source: JoiningLists
    Next click on OK and save &Next click on the title field td
    Click on common column in the response table


    Next Click on data source dropdown and Select joined subview. It opens following popup so we need to select common column in both table MOC ID NO and click on OK

    Comment the column heading of the response list as follows.

     
    Add required column names in dvt_2.rowview  
     
     
    Add column heading the top of heading column names only.
    By adding the bellow code after columns heading we can get total record count on the top of page 
     

    By adding the bellow code after group column name
    we can get group wise rows count as follows


    Note: if the columns are not displayed in the same column information then give fixed width for column title and column data  
    After this also not displayed in the proper manner give class name “table” for columns heading table.
    <table border="0" width="100%" cellpadding="2" cellspacing="0" class="table">
    Example:
     

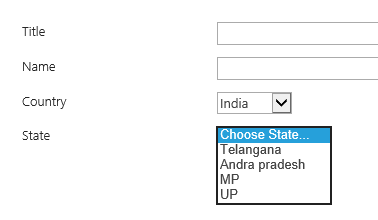
    Cascaded Dropdown List in SharePoint List


    1.Create List Name with Country
       Create Country Column  with single line of text

     
    2.Create List Name with State
       Create State Column  with single line of text
       and Create Country lookup column


    3. Create Employee List with 2 lookup columns State and Country using Above Two lists
        and required columns.
       Open the NewForm.aspx add the bellow code after Main Content Place Holder
     
    <asp:Content ContentPlaceHolderId="PlaceHolderMain" runat="server" >
    <script type="text/javascript" src="../../SitePages/JS/jquery-1.10.2.js"></script>
    <script type="text/javascript" src="../../SitePages/JS/jquery.SPServices-0.7.2.js"></script>
    <script type="text/javascript">   
    $(document).ready(function()
    {               
      $().SPServices.SPCascadeDropdowns(
      {
        relationshipList: "State",
        relationshipListParentColumn: "Country",                    
        relationshipListChildColumn: "State",                    
        relationshipListSortColumn: "ID",                    
        parentColumn: "Country",                    
        childColumn: "State",                   
        promptText: "Choose State...",                    
        debug: true               
      });    
    }); 
    <script>

    Relation Ship Explanation As Follows:
     After Adding the Above Code Result as follows.
     

    Friday, December 19, 2014

    FBA in SharePoint 2013

    Description:

    Today we are going to see how to Configure Forms Based Authentication in SharePoint 2013. In SharePoint, Microsoft offering two different types of authentication such as Windows Authentication and Forms Based Authentication. By default we will get the windows authentication to our site but if we want to provide the Forms based authentication to our SharePoint site we must have to do some settings while creating of web application of a site. Now we will see step by step process of configuring forms based authentication in SharePoint 2013.
    What is Windows Authentication in SharePoint?
    Windows authentication is a secure form of authentication which is offered by Microsoft and the user name and password are hashed before being sent across the network. When you enable the Windows authentication in our SharePoint Site, the client browser sends a strongly hashed version of the password in a cryptographic exchange with our Web Server. We will get the users information such as username, password, role, and group he/she belongs, from the Active Directory and store the user information into content database of SharePoint, this will happens in installation process of SharePoint Farm or we can do it after installation of SharePoint using user management services in SharePoint.
    What is Form Authentication in SharePoint?
    Some companies maintain their employ user information in databases rather than Active Directory. So here all the users information such as usernames, passwords, roles and groups will stored in a database that may be MS SQL, Oracle or MySQL in this type of situations most of the companies will prefer to use form based authentication instead of rebuild the new Active Directory.

    Steps to work with FBA
    1  1. Create Database
        2. Create Web Application
        3.  Modify 3 web. Configuration files
    i.             FBA  (web Application) 
    ii.           Central Administration
    iii.          STS (Security service Token)
        4.Set user policy

    Step-1: Create Database

    Create Database using aspnet_regsql.exe Application
    Go to the location C:\Windows\Microsoft.NET\Framework64\v4.0.30319

    And select aspnet_regsql.exe  right click select run as administrator


     It opens
      è ASP.Net SQL server Setup wizard
      è Click on next button
      è Select the SQL server for application services and click on next button
      è Select the server and data base details
         Server: SQL Server Name (System name) (ex: HYD38)
         Select authentication type windows
         Database Name: FBADB
      è Click on next button and next and finish.
    Note: Check the database name FBADB and its table’s names (like users, roles  ...Etc.)  In SQL Server

    Step step2: Create Web Application

      è Go to central administration
      è Click on Application management
      è Click on new
      è Give following details 


    Click on OK.

    Web application creates and it asks you want create site collection
    Click on Create Site Collection page. 

    Create Site collection:
    Give site title, template name and primary site collection administrator name
    Click on OK button

    Step3: Modify 3 web. Configuration files
    i.             FBADemo Web Application web.config file (Add connection string, Membership provider and role provider)

    Go to IIS
    Go to run command (Window+R)
      è Enter inetmgr
      è Press enter button it open IIS
      è Go to sites
    Click on web application (FBADemo – 6666)

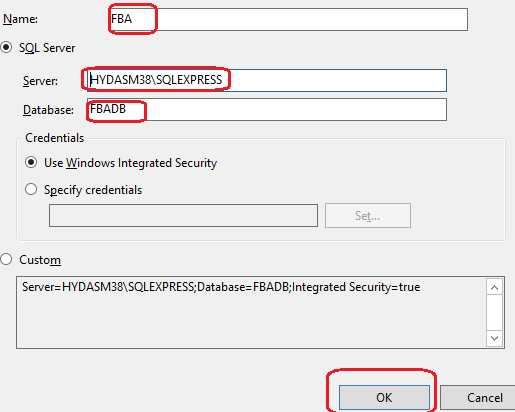
    a.   Connection string

    In middle pan double click on Connection Strings icon
    On the right pan click on Add and the enter the details bellow


    Click on OK button.
    b.    Member ship provider

    Click on web application (FBADemo – 6666)
    In middle pan double click on Providers icon
    In middle pan select feature type .Net User


    On the right pan click on Add and the enter the bellow details 


    Click on Ok button

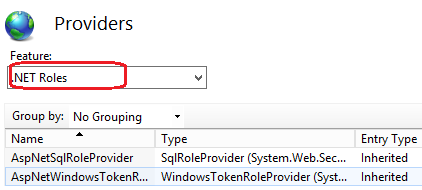
    c.    Role provider :

    Click on web application (FBADemo – 6666)
    In middle pan select feature type .Net Roles


    On the right pan click on Add and the enter the bellow details 


    Click on Ok button

    d.   Create role
    Click on web application (FBADemo – 6666)
    In middle pan double click on .net Roles icon and it displays following error message


    We need to change default role provider to FBARoleProvider

    So click on right pan set Default provider
    And change default provider ‘c’ to FBARoleProvider 


    Click on OK

    Click on add right pane and give role name r1


    Click on OK
    Similarly create other roles like r2, r3, etc.

    e.   Create User
    Click on web application (FBADemo – 6666)
    In middle pan double click on .net Users icon and it displays following error message


    We need to change default member ship provider to FBAMembershipProvider

    So click on right pan set Default provider
    And change default provider ‘i’ to FBAMembershipProvider
    Click on OK
    Click on add right pane and give the details 


    Click on next
    Select role type r1 and click on finish.
    Similarly create other users like user_02, user_03 etc.

    Note: revert to default membership provider FBAMembershipProvider to ‘i’            and default role provider FBARoleProvider to ‘c’
       If you got any error message just click on OK.

    i.             Click on web applications (SharePoint Central Administration v4)
    Repeat the steps in above web application (FBADemo – 6666)
    a, b, c ( Connection string , member ship provider  and role provider) details

    ii.            Click on web applications (SharePoint Web Services)
            Repeat the steps in above web application (FBADemo – 6666)
                 a, b, c ( Connection string , member ship provider  and role                     provider) details

    Note: In central admin we need to change default Membership provider
    ASPNetSQLMembershipProvider  to FBAMembershipProvider 


                 Similarly Change
                Default Role provider
                ASPNetSQLRoleProvider to   ASPNetWindowsTokenRoleProvider
    1.   Set user policy

    Go to center Admin select the FBADemo Web Application
    Click on user policy on the top of the ribbon
    Next click on Add users
    Next select “All zones”
    Next select the User: user_01 or All Users (FBAMembershipProvider)All Users (FBAMembershipProvider)
    And Permission: full control
    Click On finish.
    Note: Uncheck the anonymous access to the web application. If you are not added user to user policy you got following message
    Sorry, this site hasn't been shared with you. 
    So in user selection you can select All Users (FBAMembershipProvider)All Users (FBAMembershipProvider) instead of user_01

    Note: if the site users have different permission levels so you can create separate groups for users i.e. Viewers, Members and Owners. Add these users to respective groups while creating the users at registration page.

    Apply FBA permission to List
    Go to list
    Click on list settings
    Next click on permissions for this list
    Next Click on stop inheriting permission
    It display one popup like create unique permissions for this?
    Click on OK
    Next click on grant permissions on the top of the ribbon
    Enter All Users (FBAMembershipProvider)
    Click on show hide option select permission contribute, next click on Share.