Wednesday, April 20, 2016

Validate XSS reflection attacking page URL

Url:
https://test.com/Support/Employee/AllItems.aspx/?--%3E%3C/script%3E%3Cscript%3Ealert(235213)%3C/script%3E

In the above url it shows alert bydefault
Solution for this:
<script type="text/javascript">
       var pageUrl = window.location.href;
       var htmlTags = ["script", "style", "img", "font"];
       for (i = 0; i < htmlTags.length; i++) {
           var tagName = htmlTags[i].toString();
           if (pageUrl.indexOf(tagName) > -1) {
               window.location.href = pageUrl.split("?")[0];            
           }
       }
 </script>

the above code remove alert.

Wednesday, November 4, 2015

Manage content and structure shows internal server error

Issue: 
when the site owner click on manage content and structure it shows internal server error
Solution: go to the site actions --> click on the view all site content
here click on each list and find out any of the list  shows internal server error, delete that corrupted list using SharePoint designer.
now manage content and structure is working fine


Thursday, February 19, 2015

SharePoint Interview Quetions

Company 1
---------------------------------------------------------------------------------------------
1.what are the new features in 2013.
2.without developing the timer can we run the job.
3.why we are used Oweb.allowunsafeupdates=true;
4.do you know about apps
5.the user does not have permission in the site but he can add the record.how it possible through code?
6. what are different joblocktype types in the timer job
7.what are the implementation steps to implements the FBA in 2010 or 2013(membership provider and role provider)
8.write a program for adding attachment in sharepoint.
9.what is the difference b/w List and Document liabrary.
10.How to attach lotus note DB to SP
11.What is Reindexing in sharepoint.
12.How publish infopath forms
13.Are you working powershell commands
14.how we can get objects using powershell
15.what is a content type
16.Can we implement a content type in all site collection level
17.what is content type hub
18.how we can attach event receiver for specific list
19.how we can attach event receiver for two lists
20.are you involved in DB maintenance
21.what is a Resource throttling
22.what is the difference b/w SRS reports and Crystal Reports
23.what is a before and after event receivers
24.what is the difference between allow unsafeupdats and RunwithElevatedprivilenges
25.How implement Properties in sharepoint

Company 2
------------------------------------------------------------------------------------------------
1.How to set custom application page as welcome or Home page.
2.I want to show one master page for some users and other master page others how you can do this.
3.Can we call asynchronous call in synchronous call.
4.How to debug JQury file & Css file.
5.How to get text box value using JQuery
6.How you deploy master page using VS.
7.Element.xml file what contains.
8.Directly modified changes are reflected in timer jobs.

Company 3
----------------------------------------------------------------------------------------------
1.What are new feature in SP2013.
2.what are new features you are implemented in SP2013.
3.What are the different types of constructors in timerJobs.
4.What are the enumarators in JobLockTypes in SP Timer Job tell about that.
5.what is the difference b/w Crawling service and Indexing.
6.How we can get values from one user control to another user control that are present in same Webpart.
7.we have 100 users that members have read permission per one list ad remaining people have edit permission
  for the same list how you give this permission using out of box
8.what is marks percentage from 10th to Mca
9.How you are implemented client object model in SP2013.
10.Can we call load method more than once.
11. Camal query is available in Client object model.
12.what are new feature you are implemented in workflows.
13.are you worked with info path forms.
14.How we can take Content DB back up from 2010 to 2014.
15.do you have knowledge on SQL & .Net.
16.How much length of procedure you written in SQL.
17.How much time you take for design & coding for wsp in VS.
18.what is a FBA & Windows authentication SP.
19.I want send mails for 5 days before user How you can send mails to users
20.timer call in two ways retention policy and timer job using VS.
21.are you worked with powershell commands.
22.are you worked with apps.
23.what are different types delegate controls in SP

Company 4
----------------------------------------------------------------------------
1st Round:
1.what is the difference b/w powell shell and stsadm tool
2.How integrate .net application to sharepoint
3.Code standards in SP
2 round:
----------------
1.what is difference b/w Configuration database and content database
2.what is the difference b/w visual studio wf and designer workflows
3.what is managed meta data term
4.how you get the information from client
5.how to migrate the data from LN to SP
3.round
--------------
joining & ending times in the worked companies
2.are you involved with client requirements.

Blog:
http://sharepointquester.com/2012/03/06/activate-and-configure-in-place-records-management-in-sharepoint-2010/


Monday, December 22, 2014

Linked Data Source Joining


To work with inked data source join,
there must be one common column relationship between two lists.
Otherwise it is not works.
do following Steps:
Step: 1
Create two Lists with Names as Indent Request and Indent Response
and its common column name is     MOC ID NO
Step: 2
Create linked data source(JoiningLists) using these two lists with join selection.
Step: 3
Create web part page
Step: 4
Create Data View web part

Step: 3
Open SharePoint designer with respective site url
On the left pan click on site Pages
Click on Web part page
Give name: JoiningLists
Click on between the web part zone
<WebPartPages:WebPartZone runat="server" Title="loc:FullPage" ID="FullPage" FrameType="TitleBarOnly">
<ZoneTemplate>
On the Top of ribbon select Data view
Next click on More Data Sources
Select Linked data source: JoiningLists
Next click on OK and save &Next click on the title field td
Click on common column in the response table


Next Click on data source dropdown and Select joined subview. It opens following popup so we need to select common column in both table MOC ID NO and click on OK

Comment the column heading of the response list as follows.

 
Add required column names in dvt_2.rowview  
 
 
Add column heading the top of heading column names only.
By adding the bellow code after columns heading we can get total record count on the top of page 
 

By adding the bellow code after group column name
we can get group wise rows count as follows


Note: if the columns are not displayed in the same column information then give fixed width for column title and column data  
After this also not displayed in the proper manner give class name “table” for columns heading table.
<table border="0" width="100%" cellpadding="2" cellspacing="0" class="table">
Example:
 

Cascaded Dropdown List in SharePoint List


1.Create List Name with Country
   Create Country Column  with single line of text

 
2.Create List Name with State
   Create State Column  with single line of text
   and Create Country lookup column


3. Create Employee List with 2 lookup columns State and Country using Above Two lists
    and required columns.
   Open the NewForm.aspx add the bellow code after Main Content Place Holder
 
<asp:Content ContentPlaceHolderId="PlaceHolderMain" runat="server" >
<script type="text/javascript" src="../../SitePages/JS/jquery-1.10.2.js"></script>
<script type="text/javascript" src="../../SitePages/JS/jquery.SPServices-0.7.2.js"></script>
<script type="text/javascript">   
$(document).ready(function()
{               
  $().SPServices.SPCascadeDropdowns(
  {
    relationshipList: "State",
    relationshipListParentColumn: "Country",                    
    relationshipListChildColumn: "State",                    
    relationshipListSortColumn: "ID",                    
    parentColumn: "Country",                    
    childColumn: "State",                   
    promptText: "Choose State...",                    
    debug: true               
  });    
}); 
<script>

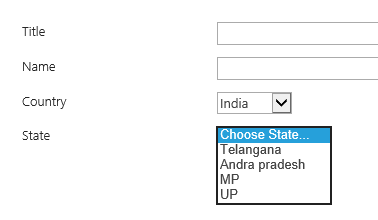
Relation Ship Explanation As Follows:
 After Adding the Above Code Result as follows.
 

Friday, December 19, 2014

FBA in SharePoint 2013

Description:

Today we are going to see how to Configure Forms Based Authentication in SharePoint 2013. In SharePoint, Microsoft offering two different types of authentication such as Windows Authentication and Forms Based Authentication. By default we will get the windows authentication to our site but if we want to provide the Forms based authentication to our SharePoint site we must have to do some settings while creating of web application of a site. Now we will see step by step process of configuring forms based authentication in SharePoint 2013.
What is Windows Authentication in SharePoint?
Windows authentication is a secure form of authentication which is offered by Microsoft and the user name and password are hashed before being sent across the network. When you enable the Windows authentication in our SharePoint Site, the client browser sends a strongly hashed version of the password in a cryptographic exchange with our Web Server. We will get the users information such as username, password, role, and group he/she belongs, from the Active Directory and store the user information into content database of SharePoint, this will happens in installation process of SharePoint Farm or we can do it after installation of SharePoint using user management services in SharePoint.
What is Form Authentication in SharePoint?
Some companies maintain their employ user information in databases rather than Active Directory. So here all the users information such as usernames, passwords, roles and groups will stored in a database that may be MS SQL, Oracle or MySQL in this type of situations most of the companies will prefer to use form based authentication instead of rebuild the new Active Directory.

Steps to work with FBA
1  1. Create Database
    2. Create Web Application
    3.  Modify 3 web. Configuration files
i.             FBA  (web Application) 
ii.           Central Administration
iii.          STS (Security service Token)
    4.Set user policy

Step-1: Create Database

Create Database using aspnet_regsql.exe Application
Go to the location C:\Windows\Microsoft.NET\Framework64\v4.0.30319

And select aspnet_regsql.exe  right click select run as administrator


 It opens
  è ASP.Net SQL server Setup wizard
  è Click on next button
  è Select the SQL server for application services and click on next button
  è Select the server and data base details
     Server: SQL Server Name (System name) (ex: HYD38)
     Select authentication type windows
     Database Name: FBADB
  è Click on next button and next and finish.
Note: Check the database name FBADB and its table’s names (like users, roles  ...Etc.)  In SQL Server

Step step2: Create Web Application

  è Go to central administration
  è Click on Application management
  è Click on new
  è Give following details 


Click on OK.

Web application creates and it asks you want create site collection
Click on Create Site Collection page. 

Create Site collection:
Give site title, template name and primary site collection administrator name
Click on OK button

Step3: Modify 3 web. Configuration files
i.             FBADemo Web Application web.config file (Add connection string, Membership provider and role provider)

Go to IIS
Go to run command (Window+R)
  è Enter inetmgr
  è Press enter button it open IIS
  è Go to sites
Click on web application (FBADemo – 6666)

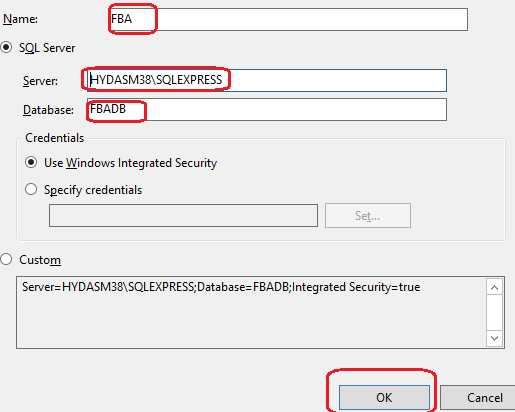
a.   Connection string

In middle pan double click on Connection Strings icon
On the right pan click on Add and the enter the details bellow


Click on OK button.
b.    Member ship provider

Click on web application (FBADemo – 6666)
In middle pan double click on Providers icon
In middle pan select feature type .Net User


On the right pan click on Add and the enter the bellow details 


Click on Ok button

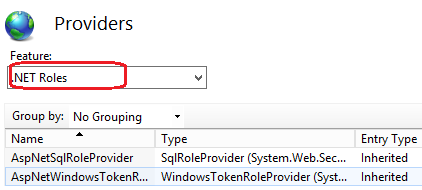
c.    Role provider :

Click on web application (FBADemo – 6666)
In middle pan select feature type .Net Roles


On the right pan click on Add and the enter the bellow details 


Click on Ok button

d.   Create role
Click on web application (FBADemo – 6666)
In middle pan double click on .net Roles icon and it displays following error message


We need to change default role provider to FBARoleProvider

So click on right pan set Default provider
And change default provider ‘c’ to FBARoleProvider 


Click on OK

Click on add right pane and give role name r1


Click on OK
Similarly create other roles like r2, r3, etc.

e.   Create User
Click on web application (FBADemo – 6666)
In middle pan double click on .net Users icon and it displays following error message


We need to change default member ship provider to FBAMembershipProvider

So click on right pan set Default provider
And change default provider ‘i’ to FBAMembershipProvider
Click on OK
Click on add right pane and give the details 


Click on next
Select role type r1 and click on finish.
Similarly create other users like user_02, user_03 etc.

Note: revert to default membership provider FBAMembershipProvider to ‘i’            and default role provider FBARoleProvider to ‘c’
   If you got any error message just click on OK.

i.             Click on web applications (SharePoint Central Administration v4)
Repeat the steps in above web application (FBADemo – 6666)
a, b, c ( Connection string , member ship provider  and role provider) details

ii.            Click on web applications (SharePoint Web Services)
        Repeat the steps in above web application (FBADemo – 6666)
             a, b, c ( Connection string , member ship provider  and role                     provider) details

Note: In central admin we need to change default Membership provider
ASPNetSQLMembershipProvider  to FBAMembershipProvider 


             Similarly Change
            Default Role provider
            ASPNetSQLRoleProvider to   ASPNetWindowsTokenRoleProvider
1.   Set user policy

Go to center Admin select the FBADemo Web Application
Click on user policy on the top of the ribbon
Next click on Add users
Next select “All zones”
Next select the User: user_01 or All Users (FBAMembershipProvider)All Users (FBAMembershipProvider)
And Permission: full control
Click On finish.
Note: Uncheck the anonymous access to the web application. If you are not added user to user policy you got following message
Sorry, this site hasn't been shared with you. 
So in user selection you can select All Users (FBAMembershipProvider)All Users (FBAMembershipProvider) instead of user_01

Note: if the site users have different permission levels so you can create separate groups for users i.e. Viewers, Members and Owners. Add these users to respective groups while creating the users at registration page.

Apply FBA permission to List
Go to list
Click on list settings
Next click on permissions for this list
Next Click on stop inheriting permission
It display one popup like create unique permissions for this?
Click on OK
Next click on grant permissions on the top of the ribbon
Enter All Users (FBAMembershipProvider)
Click on show hide option select permission contribute, next click on Share.


Friday, November 21, 2014

Timer job errors and solutions in SharePoint

Introduction


In this post we will see what the various errors that come while handling Timer Job in SharePoint.
These errors are sometime common for many developers but could take time to resolve. Hope this will resolve your errors and save your time.
Don’t miss the article how to create Timer job for specific site in SharePoint

What are the points that are covered

  • Frequent errors that come up with Timer job and their resolution


Error: Access denied while creating/deleting the Timer job from the feature


We may encounter the following error while activating the feature from UI and inside the feature activation code we have code to create/delete Timer job


Access denied.
at Microsoft.SharePoint.Administration.SPPersistedObject.Update()
at Microsoft.SharePoint.Administration.SPJobDefinition.Update()
at xxx.xxx.<>c__DisplayClass1.b__0()


Solution


Activate the feature from command prompt rather than from the UI and we won’t be getting the above error
Following is the quick code to activate or deactivate the feature by stsadm


Activating the feature
stsadm -o activatefeature -fileName TimerJobFeatureReceiver\Feature.xml -url http://adicodes/sites/mysite -force


Deactivating the feature
stsadm -o deactivatefeature -fileName TimerJobFeatureReceiver\Feature.xml -url http://adicodes/sites/mysite -force


Error: Timer job running more than once


This is one common error many users face. For example, we have written sending email while Timer job executes. It will be so annoying if users says that they got more than one email with same content and time stamp.

Solution
This duplicate job running behavior is due to the SPJobLockType in the constructor.
Suppose if we are using this constructor

public TimerJob(SPWebApplication webApp): base("TimerJob", webApp, null, SPJobLockType.ContentDatabase)
{
this.Title = "TimerJob";
}

Timer job will execute more than once if the web application for which Timer Job is associated has more than one content database
We can check the number of content databases for the webapplication from central admin site
Go to http://centraladminurl/_admin/CNTDBADM.aspx. Select the webapplication and we can check the number of content databases associated with it

Change the SPJobLockType enumerator value from ContentDatabase to Job in the constructor as follows

public TimerJob(SPWebApplication webApp): base("TimerJob", webApp, null, SPJobLockType.Job)
{
this.Title = "TimerJob";
}


Now, the Timer job will execute only once though there are multiple content databases associated

You can check what the SPJobLockType enumeration is for at
http://msdn.microsoft.com/en-us/library/microsoft.sharepoint.administration.spjoblocktype.aspx


Error: access denied While Updating the timer Job

override bellow method in Job definition class before or after execute method

protected override bool HasAdditionalUpdateAccess()
        {
            return true;
        }
 
protected override Execute()
{

}

Error: Latest code is not running after Timer job is deployed


This is also one common error many users face. They get surprised why the latest deployed Timer job code is not running and sometimes get the
following error

OWSTIMER.EXE (0x0AAC) 0x0BF0 Windows SharePoint Services Topology 7i0u High SharePoint cannot deserialize an object of type Pages.SurveySiteEmailJob, Pages, Version=1.0.0.0, Culture=neutral, PublicKeyToken=c475c2fd38120dac on this machine.
This typically occurs because the assembly containing this type is not installed on this machine.
In this case, this message can be safely ignored. Otherwise, the assembly needs to be installed on this machine in a location that can be discovered by the .NET Framework.


Solution


Just restart the timer service
How to restart the Timer job service in SharePoint 2010

Go to Start > Run (Windows Key+R)
Type Services.msc and hit enter or click on OK.
Under services locate “SharePoint 2010 Timer”.
Stop and Start service

or
with command line code
net stop “SharePoint 2010 Timer”
net start “SharePoint 2010 Timer”

How to restart the Timer job service in SharePoint 2007
Go to Start > Run (Windows Key+R)
Type Services.msc and hit enter or click on OK.
Under services locate “Windows SharePoint Services Timer”.
Stop and Start service
or
with command line code
net stop “Windows SharePoint Services Timer”
net start “Windows SharePoint Services Timer”

Conclusion


We might have tried a lot for figuring out what is the cause of the error. Hope the the above resolutions will save your time.
You can add up some more bugs if you encounter, so that it will be helpful for any SharePointers:)